Software
PAUT SDK 프로그램 - DSK
DSK는 성산연구소에서 개발한 SDK 프로그램을 의미합니다.
다양한 산업 환경에서 사용 할 수 있도록 설계가 되어 있고 효율적인 방법을 적용하여 사용자가 쉽게 구축할 수 있는 C# 기반의 개발 키트입니다.


특징
읽기 쉬운 지원 문서
DSK 프로그램에 익숙해지는 데 도움이 되는 문서를 제공합니다.
API 참조, 시작하기 및 DSK 설치 문서를 참조할 수 있습니다.
DEEPSOUND 장비 호환성
DSK는 모든 DEEPSOUND 장비와 호환됩니다.
LAN 케이블을 사용하여 장치를 PC에 연결하여 프로그램을 실행하십시오.
프로그램, 설명서, 예시 제공
DSK는 사용자에게 개발 및 연구 목적으로 튜토리얼 파일을 제공합니다.
Tutorial은 Init Device부터 SamplePAUT / UT까지 순차적인 예제로 구성되어 있습니다.

외부 장비 연결 구성
예시로 DSK 프로그램은 외부 장비와 USB / LAN 통신을 이용하여 쉽게 연결할 수 있다는 것을 확인 할 수 있습니다.
- Init device: 장비(하드웨어 연결)
- Freeze: Data 통신 일시 멈춤
.png)
S-scan 구성
예시로 Raw data를 이용하여 S-scan를 구성하여 제작한 이미지입니다.
Raw data를 활용하여 다양한 기능 및 연구를 진행 할 수 있습니다.
.png)
A-scan 구성
예시로 Vector, Frame data, etc. 여러 요소들을 이용하여 하나의 이미지를 구성했습니다.
모든 내용들은 제공되는 프로그램에서 확인하고 참고 하실 수 있습니다.
.png)
Scan Encoder 구성
예시로 Inspection 모드에 필요한 요소 중에 Encoder parameter에 대한 내용입니다.
Encoder 설정 시 어떤 내용이 필요한지 구성한 것이며, 자세한 내용은 제공한 자료를 참고 하시면 됩니다.
.png)
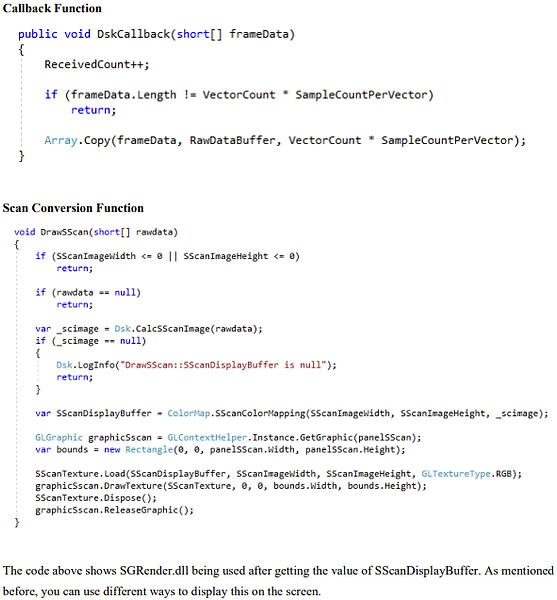
DSK 프로그램 구성
예시로 제공 되는 프로그램에 대한 적용 되는 방식을 설명한 부분입니다.
다양한 Function 기능이 있으니 제공 되는 프로그램을 많이 활용하시길 바랍니다.
.png)
B/C Scan 구성
DSK에서는 B/C Scan도 지원하고 있어 전체적인 PAUT 이미지를 확인할 수 있습니다.
또한, 두께 / 부식 측정이 필요한 다양한 산업체에서 사용이 가능하고 이를 활용하여 프로그램을 사용할 수 있습니다.
DSK 원격 연결
DSK를 사용하여 데스크탑과 노트북에 자유롭게 연결하십시오.
DSK 튜토리얼 예시
DEEPSOUND 장비와 DSK를 사용하여 프로그램을 개발하십시오.


프로그램과 장비 연결
이것은 DSKTutorial에서 제공하는 일련의 프로그램 중 첫 번째입니다.
InitDevice는 장치와의 연결 상태를 확인하기 위해 생성되었습니다.
장치와 연결이 설정되면 장치 초기화 버튼을 클릭하여 증가하는 숫자를 확인하십시오.


S-스캔
DSKTutorial에서 제공하는 두 번째 프로그램입니다.
SScan은 장비 연결 후 Phased Array 이미지를 확인하기 위해 생성되었습니다.
연결하려면 장치 초기화 버튼을 클릭하세요.


A-스캔
DSKTutorial에서 제공하는 세 번째 프로그램입니다.
Ascan은 진폭과 펄스 형태를 확인하기 위해 생성되었습니다.
연결하려면 장치 초기화 버튼을 클릭하십시오.


Inspection 기능
DSKTutorial에서 제공하는 네 번째 프로그램입니다.
검사 프로그램은 인코더의 작동을 확인하기 위해 만들어졌습니다.
연결하려면 장치 초기화 버튼을 클릭하십시오.


Sample PAUT 프로그램
이것은 DSKTutorial. 에 제시된 열 번째 프로그램입니다.
SimplePAUT은 모든 파라미터 설정을 조작할 수 있는 곳으로 A, S, C, B 스캔의 레이아웃과 검사 등 튜토리얼 전반에 걸쳐 학습한 내용을 구현한다.
연결하려면 장치 초기화 버튼을 클릭하세요.

